Outdoor Lighting Design for a Radiant Patio or Backyard

Outdoor lighting design drastically changes how your patio and backyard look…and how it functions! Lighting can direct, create zones, and add specific mood.
The outdoor lighting design process consists out of 3 simple elements:
- creating an area plan
- choosing a lighting strategy
- picking lighting fixtures.
It’s important to include ambient, task, and accent lights in outdoor lighting design. You should also only use lighting that is ‘outdoor rated’.
This complex task will be incredibly easy…as long as you follow the no-nonsense guide below, in which I’ll show you exactly how to plan your outdoor lighting so it fits your needs (and exceeds expectations).
Outdoor Lighting Design Step #1: Create a Plan of the Area


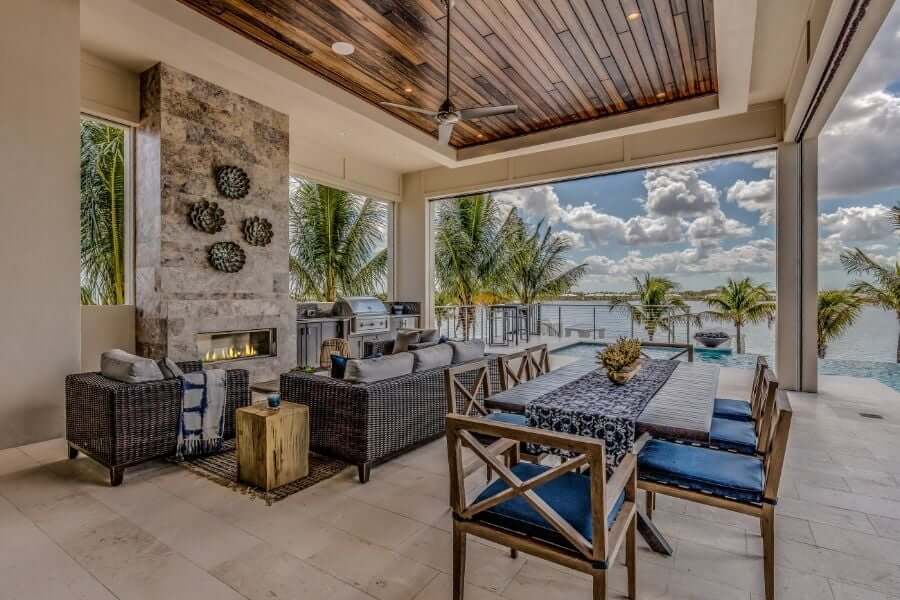
To start the design process, it’s vital to determine the exact area you want to illuminate. In the pictures above, you can see a whole pool area and an outdoor kitchen.
No matter you set up, you can find a lighting solution that suits you. Remember to include massive plants (when they can become an obstacle or a focal point) or pathways (when you want to return to your house after sunset).
Once you have the little details sorted out, create an outdoor lighting design plan with four steps listed below:
- Draw the whole area in a proper scale, with an outdoor kitchen, dining table, fireplace, pool, fence, big plants and everything else located in it.
- Mark all the workspaces (red), dining (yellow), and relaxing areas (blue).
- Draw paths people are going to follow to reach the restroom or the kitchen (dotted line).
- Look around for interesting elements worth accentuating, such as a brick wall, bar, grill, stone countertop, a plant/tree (mark with X).
Now you have your plan, it’s time to figure out your strategy.
Outdoor Lighting Design Step #2: Figure Your Expectations


There are so many things you can achieve with outdoor lighting design! As a result, it’s important to figure out at the very beginning what your goal is.
In the first picture, you can see an outdoor lighting design for a deck outdoor kitchen. It consists out of wall-mounted lights (task lights), string lights attached to the awning, and an umbrella (ambient lights). This is a budget-friendly solution that delivers function with style.
The second picture shows a pool area with multiple functional zones (inside of the pool, bar, and lounging area). What comes in handy in these areas are designing outdoor lighting separately for each zone – you can turn them on when needed, but have the desired effect in each zone.
For example, the bar needs to be illuminated just enough to prepare drinks, while in the lounging area you want as little light as possible to see the stars.
The third picture shows sophisticated outdoor lighting design. This set-up uses light not only for illuminating, but also for showing off assets. There are so many effects you can achieve: glazing, sparkling, washing, and more!
Stuck on what to choose? There are a few things to consider. First of all, the budget: more expensive designs are worth considering if you plan to sell the house, as pictures of the illuminated backyard are a huge selling point.
According to a 2022 report by the National Association of Home Builders, exterior lighting was in the top five most desired features for all generations!
Second of all, if you want to go for a grand effect with a moderate budget, check your electrical installation. It may need expanding if you’re going to add plenty of new outdoor light fixtures.
Outdoor Lighting Design Step #3: Choose Your Fixtures

Now you have your goal and your plan. It’s time to get to know lighting types and specific fixtures.
There are basically three types of outdoor lighting:
- ambient
- task
- accent
Ambient Lighting to Light Up a Large Space
Ambient lighting is the one that keeps the whole area well illuminated. This lighting type needs a dimmer, as people need less and less light when the night is passing.
In fact, lowering the intensity of light is going to help everyone fall asleep later. The intensity of light influences also influences the speed people eat. When the light is intense they tend to eat faster and finish the night earlier, so if you want your party to last longer, use a dimmer.
Task Lighting Keeps You Safe While Working or Cleaning
Task lights’ goal is to brighten up every area where any sort of work takes place – from a countertop to the inside of the shelf. This is a must-have installation for safety.
You can add a task light to areas such as:
- working areas, like a countertop
- a bar counter
- a grill area
Decorative Lighting to Highlight Specific Areas
Accent lights are used to stress the surface structure or a specific element of the area. The purpose of this type is not only to beautify the space, but to guide guests (such as to the bathroom or to the pool).
Finding a switch, or accessing the house at all, shouldn’t be problematic – strong lighting should be a seamless experience!
What is important to know at this very moment is: there are fixtures that can do it all. It’s not like you need a different one for every job. Look at your plan now to think about what types of lighting are needed and where.
Now it’s time to get to know these outdoor lighting fixtures a little better. Below are several popular and functional examples.
| Fixture type | Ambient | Task | Accent |
|---|---|---|---|
| A fan with a light fixture | ✔ | ||
| Chandelier | ✔ | ||
| String lights | ✔ | ✔ | |
| Scones | ✔ | ✔ | ✔ |
| Recessed outdoor kitchen lights | ✔ | ✔ | ✔ |
| Grill lights | ✔ | ||
| Under countertop lighting | ✔ | ✔ | |
| Pendant | ✔ | ✔ | ✔ |
| Track lights | ✔ | ✔ | |
| Landscape lights | ✔ | ||
| Pathway lights | ✔ |
As you can see, there are plenty of fixtures that can deliver more than one lighting type. This matters when you try to limit the number of fixtures, as more fixtures usually need more power. More fixtures = higher monthly bills and an additional budget for the electrician.
Got all that? Let’s start this list of tips with ambient outdoor lighting design.
Outdoor Lighting Design: Ambient Lights

Ambient light is the one that shows where to spend time after sunset at your patio, outdoor kitchen, and/or backyard. The main goal is to add ambient light fixtures where you want people to cook, dine, lounge, sit, etc.
Let’s go now through specific fixtures so you can choose what works best for you.
Fan With a Light Fixture


What makes this outdoor lighting design king? First of all, it’s a device that combines plenty of much-wanted features.
It not only illuminates the space, but also adds a cool breeze. Some fans can also spray a little mist (these are the dreamiest outdoor additions).
The spiders and flying insects also don’t enjoy fans. Depending on where you live, this little detail could be one of the biggest selling points – they are to me! If you want to illuminate the area after the sunset, most lights tend to attract insects, but not this type.
It works great for the patio and is excellent for the dining and cooking area. What’s not to love?
If you know an outdoor fan is the solution for you, a crucial detail is to choose a proper size for your patio or gazebo. The bigger the space, the bigger the fan has to be (or multiple fans need to be added).
| Space size | Fan size |
|---|---|
| up to 75 sq ft | 29 – 36 in |
| 76 – 144 sq ft | 36-42 in |
| 144 – 225 sq ft | 44 in |
| 225 – 400 sq ft | 50-54 in |
What if you have a table? Well, if your space is 144 sq ft or so, you can either install one 36-42″ fan or two 29-36″ fans. One works better in an area closer to a square shape, while two are better for a rectangular space.
How about using a fan when the ceiling is finished or the enclosure isn’t permanent? I know two ways:
- portable fans with light sources (they come with a cable to plug into the socket)
- standing fans with light sources (same story)
Portable and standing lights may be useful in places where the weather changes drastically during the year. Snowy winter won’t be an issue when you can store your fixture in the garage, right?
Chandelier


This is a fixture that won’t work for every style, as it’s usually a statement piece. If you know what you want to say with your design, this could be the ultimate finishing touch.
A chandelier draw people’s attention and can help in creating a stunning focal point. It can be used to fool the eye, too, since using a slightly-too-big chandelier may visually enlarge the space.
Chandeliers work best on patios, as they can be used to enhance the much-wanted indoor-outdoor experience. What’s great about this exact frame is how it can be used for a sophisticated approach, as it creates a lovely glitter effect.
Remember to only use outdoor-rated chandeliers, though. This logic applies to all outdoor fixtures.
String Lights


String lights add a charming tone to an outdoor area. They’re inexpensive, look amazing, and illuminate with a soft light almost anywhere you need.
There are plenty of rules to follow with them, though. Yard Envy has an especially helpful guide that breaks down especially the technical perspective, such as choosing proper bulbs and electrical safety limits.
As you can see in the pictures above, outdoor light strings can be used as ambient and accent light. The great benefit is you can simply plug them, so no electrician needs to assist you. Just remember to dust them frequently, as spiders enjoy them, too.
There are plenty of patterns to hang string lights, but I find these six the most useful:
- The Horizon Point
- The Scalloped Square
- The Tent Point
- The V
- The X
- The Zig-Zag W
The Horizon Point, the Tent Point, and the Zig-Zag are going to give more light, as more bulbs are concentrated in the same areas.
A quick equation: your string lights length should be the space measure + 2-6 ft. The reason is string lights need to dangle a bit to look good. So, if your space is 30 ft wide, your string lights should be between 32 and 36 ft, depending on what effect are you looking for.
Scone


Scones can do miracles outdoors. This fixture works as ambient, task, and accent light.
It can also be used to add sophisticated lighting effects. Scones come in plenty of styles and a full price range, so it fits every budget.
There are three different configurations of scones for your outdoor lighting design plan:
- uplight
- downlight
- up/downlight
Uplight scones cast light upwards. They make the area larger and feel more open.
Downlight scones make an area look warm and casual. If you have the feeling that your outdoor kitchen area is too big, this solution makes everything feel cozier.
Up/downlight scones give light in both directions and help to balance out a space. These are my favorites. This type is quite popular, especially as an ambient lighting source.
There are plenty of types of outdoor scones, like half-moon, lantern, candle, and sign light. If you already have them around the exterior of the house, buying more of the same for your outdoor lighting design is a good idea.
Wall scones are installed 60″ – 72″ above the finished floor and are traditionally placed 6′ apart. They should be installed 24″ – 30″ above the countertop.
Recessed Lights


This is a fantastic solution for a patio since it creates even illumination and can add additional, sophisticated lighting effects.
The downside of recessed lights is that installation can be a pain. A similar effect can be achieved with dimmable portable LED fixtures that can be attached to a finished space.
How many do you need? Well, if you’re going for an even illumination, one recessed light should be installed for every four to six square feet of the ceiling. It’s worth illuminating crucial areas this way, like dining and cooking areas.
The dimmer is a must-have solution for recessed lights, as well. Outdoor lighting design is even more fun when it’s multipurpose.
Outdoor Lighting Design: Task Lights
Multiple types of lighting can be used as task lights in the outdoor kitchen area. Below I’ll reveal my top picks so you can narrow down your search faster.
Grill Lights

If there would be only one thing to illuminate with task light in an outdoor kitchen area, it should be the grill. You need one to avoid burns, serve raw food, and control insect populations.
There are plenty of solutions to choose from, such as:
- inexpensive clip-on the handle lights
- countertop lamps with deck or clamp base
- halogens
- downlight scones
There is literally something for every budget with outdoor lighting design.
Another great advantage of these lights is the ability to turn them on and off when needed (such as avoiding pesky mosquitoes or gnats).
Just make sure to choose a grill light fixture that provides enough light for cooking. The minimum amount to go for is 100 lumens or more.
Outdoor Kitchen/Bar Counter Lights

Preparing food without illumination is not as dangerous as grilling it, but using sharp tools in a dark is still a bad idea. Thankfully, there are plenty of solutions to choose from: not only traditional fixtures, but also LED strings.
Usually, lights are mounted above or under a counter, but as seen in the picture above, it can be a mix of both.
Installing lights slightly above the counter is going to massively improve food and drink preparation. It also can put an accent on the material of a bar or an outdoor kitchen. Both texture and smoothness can be accented with counter lights beautifully.
Adding light under the counter can help a lot with orientation in the space, such as directing guests. If the light is directed down, it’s going to accentuate the beauty of stone or brick. It shows precisely where the cabinets are, which aren’t always obvious in the dark.
Pendant

A pendant is a fixture that doesn’t work well for a simple strategy, but is fantastic for standard and sophisticated outdoor lighting design. It’s usually part of supplemental lighting and can create a focal point above the bar or dining area.
These fixtures are usually hung on a sight level, so can reflect the overall style of the outdoor kitchen or bar – for example, rustic woven or metal. If you’re going for an industrial look, glass or concrete can work well. For a modern look, glass and geometrical forms will do an excellent job.
There are multiple rules to follow while installing pendant fixtures:
- They should be installed at least 12″ from the edge of the countertop
- They should be installed about 30″ apart
- Bottom of the lamp should be 30″ – 36″ above the countertop
There are multiple types to choose from:
- drum
- dome
- linear
- lanterns
- bowl
- mini
There are so many outdoor-rated pendants, it’s easy to choose fixtures that fit a specific style.
It’s worth knowing that pendants can be a task, accent, and ambient light fixture. With dark colored shades, pendants can work as a task lighting.
You can create ambient lighting when you equip your pendant with clear or light-colored shades.
Lastly, you can create accent lighting with two pendants hanging over the side table or a focal point.
Outdoor Lighting Design: Accent Lights

Accent lights not only beautify the space, but also guide guests. It’s important not to omit them in your design so your space isn’t confusing to navigate.
For example, your accent lights can show the light switch or entrance. If your space lacks a real focal point, you can create one with light instead.
Outdoor areas are often constructed out of interesting materials like stone or concrete. Their texture is something accent lights enhance amazingly.
If there is a tall plant or tree in the area, consider illuminating it as well.
Track Light

Track lighting easily works as a multifunctional light source. It not only illuminates multiple areas at the same time, but also adds sophistication to the design by accentuating the smoothness of the walls.
This is an amazing fixture for outdoors, but it requires proper installation. If the ceiling is up to 9″, the track lights should be placed 2″ – 3″ from the wall.
For a higher ceiling the distance is 3″ – 4″. The distance between fixtures should be the same as the distance from the wall.
Landscape Lights


Using light to accentuate nature in the backyard is never a wrong move. It can be done in so many ways – from string lights to LED balls to reflectors.
There are multiple effects you can go for. You can make your patio space feel larger at night by extending it with light. Accentuating a tree or another tall plant not only adds visual interest in the distance, but influences the way people perceive the patio.
Pathway Lights


A lit-up pathway is a vital part of your outdoor lighting design plan. If there is a frequently used path at night, you can light it up with a number of fixtures.
Most of them are solar lights, so you don’t need any electrical jobs.
How to Enhance an Outdoor Lighting Design to Be Sophisticated

This basic design mainly offers function. A standard design allows you to illuminate specific areas of the backyard when needed, while sophisticated is all about creating quality.
There are multiple effects your outdoor lighting design can produce, as:
- key light (shining light on an object from a single point source of light)
- fill light (shining light on an object from two sources for more drama)
- silhouetting (diffused fill light showing off the silhouette)
- sparkle effect (producing sharp reflections on specular surfaces)
- glitter effect (a light fixture producing an effect)
- grazing surfaces (light striking the surface at a sharp angle)
- washing surfaces (light striking the surface at a wider angle)
Going for a sophisticated design is most often not choosing different fixtures, but using the ones you picked with intention.
Look at your plan again – try to figure if you can have fewer fixtures (good for your project budget as well as an electrical bill). See if any of the ones you added can be used for an effect, too.
Outdoor Lighting FAQ
How Many Lumens Should an Outdoor Lighting Fixture Have?
The dining area (table or bar) needs about 30 – 40 lumens per 1 sq ft. An outdoor kitchen needs about 30 – 40 lumens per 1 sq ft.
A grill and sink should get about 70 – 80 lumens per 1 sq ft.
How Many Lux Should an Outdoor Lighting Fixture Have?
1 lux is the size of the area a candle can illuminate. A standard 100W bulb produces roughly 1,500 – 1,700 lumens.
How Do the Outdoor Lighting Fixtures I Chose Affect Electricity Costs?
If you want to be cost-efficient in the future, it’s worth picking LEDs from the very beginning. LED lights are 90% more efficient than incandescent lightbulbs – they use 50% less energy and last up to five times longer.
Additionally, they work well in outdoor temperatures and become fully bright immediately.
What temperature lights are Best for Outdoors?
The best temperature for the outdoor kitchen lights is 2700 – 3000 Kelvin (warm color temperatures). These lights are great after sunset if the goal is to create a calm, pleasing environment.
Want to learn even more about getting the most out of your outdoor lighting design ideas? Check out these articles for even more tips and tricks:
![How to Build an Outdoor Kitchen on a Budget? [and save 3k+]](https://outdoorkitcheninsider.com/wp-content/uploads/2020/10/how-to-build-an-outdoor-kitchen-on-a-budget-small.jpg)


Have you ever considered using outdoor lighting to create a specific ambiance or mood in your outdoor space, such as using colored lights for a party atmosphere or dim lighting for a more intimate setting?