9 Proven Outdoor Kitchen Essentials That Make Life Easier

Outdoor kitchen essentials are a must-have list for your project. While slightly different depending on the owners’ needs and climate, there are a few staples you shouldn’t overlook to ensure your set-up is successful.
Essentials usually consist of the following elements:
- Grill
- Countertop space
- Storage
- Sink
- Covering
- Ventilation
- Lighting
- Trashcan
- Refrigerator
The basic list contains all the elements that create a fully functional outdoor kitchen in your patio or backyard. They ensure you can toss away trash, enjoy food, or enjoy clean air without trouble.
Outdoor Kitchen Essentials: The Must-Have List
According to realtors, there are basically five things each outdoor kitchen needs: sink, storage, grill, fridge, and countertop space. These are true basics, yes, but without lighting, ventilation, and space for trash, an outdoor kitchen could be a hazard or unpleasant.
Below are the outdoor kitchen essentials with brief descriptions and average pricing. The choices you make will heavily influence your outdoor kitchen resale value, so I recommend taking your time with your decision!
Outdoor Kitchen Essentials: A Grill

The grill is the first thing you should choose when designing outdoor kitchen essentials. An outdoor kitchen is meant to make using a grill more convenient, after all!
The smallest possible outdoor kitchen consists of a grill and countertop space.
Let’s break down the basics of putting together a functional outdoor kitchen. The two main areas you need to plan for are the cold zone, the hot zone, and the dry zone.
Cold Zones
While designing a bigger space, it’s worth adding cold essentials (refrigerator), wet essentials (sink and trash), and a dining zone. It’s important to place a hot zone next to a dry zone and far from the wet and cold zones.
Dry Zones
Do you prefer making smaller, simpler meals and entertaining a lot of company? Dry zones are areas of a kitchen where simpler recipes are made, such as a charcuterie or putting together drinks.
The term comes from how there is less chopping, grilling, or mixing. These areas should have extra countertop space for people to mingle.
Hot Zones
Choosing a grill for your backyard is often a complicated task. Professionals often advise buying a model that an owner can grow into (such as a more advanced model).
As your grilling skills improve, you don’t want to go through the trouble of replacing one after just a year or two, right? Choosing outdoor kitchen essentials also means thinking in the long-term, especially if you’re busy and don’t have time for lengthy remodeling.
There are a lot of choices when putting together a hot zone, starting with your fuel:
- gas
- charcoal
- pellet
- electric
- regular, kamado, and so on
If you’re torn on what to pick, start with your budget. Even though gas grills are a healthier option, they also require a gas connection. The gas can be delivered from the installation or tank. Installation is more convenient, but comes with the price of specialist work and permits.
If you’re not up to spending an additional $1,000 – $2,000 on utility lines, it’s worth making less expensive choices (unless you’re super lucky and utility lines are already in place).
If you decide to buy a gas grill with a tank, it’s worth purchasing a ventilated bin so your additional tank can be stored at an outdoor kitchen. It’s going to take $250 or so from your budget, but it’s much safer to keep tanks far from the house.
The perfect size for a regular family tends to be a 3 burner grill (450 – 500 sq in). Entertainers will be happier with a 5-6 burner grill (550-600 sq in).
A gas grill provides temperature regulation that enables searing (high temperatures) and indirect cooking (low temperatures). The price range is $500 – $5,000.
Let’s talk about different types of grills and which ones may become one of your outdoor kitchen essentials.

Charcoal grills are considered a less healthy and environmentally friendly choice, but have lots of fans due to their specific flavor. On average, charcoal grills are less expensive to buy, install, and maintain.
These grills don’t allow you to change temperatures quite like gas grills do, so the cooking process is a bit different. The price range is pretty large at $20 – $2,000.
Kamado, as seen in the photo above, is a very popular grill lately. These grills offer multiple options for cooking from traditional grilling to pizza baking (even cookies!). They have a long history, as they were invented 2000 years ago in Japan.
They are multifunctional and also quite appealing to look at. This option seems has amazing longevity. The price range is $320 – $2,200.
Pellet grills is an environmentally friendly option. There are even kamados that work on pellets! They seem to be a healthier option than charcoal grills, too, as they produce less acrid smoke and cook food more evenly. This is not the cheapest option, but they come in $350 – $1,300 range.
Electric grills are less popular than mentioned above, but they have their fans, too. They don’t produce smoke, so they can be used in condominiums and apartment complexes. These grills heat up fast and keep their desired temperature for longer.
They’re also one of the most environmentally friendly outdoor kitchen essentials. The price range for built-ins is $1,000 – $5,000.
If you’re all about the traditional brick style, a brick grill can be an option for you. It requires a specific space, but can be used in multiple ways. This structure costs $500+ (depending on your outdoor kitchen materials).
There are several add-ons that can help with outdoor cooking, like:
- side burner (vegetable, sauces)
- power burner (stocks, frying, boiling seafood)
- griddle (crispy bacon hibachi, style meals, steaks with sear)
- pizza oven
- smoker
While not technically outdoor kitchen essentials, you may just find them a must-have option depending on your cooking and entertaining style.
If you’re not sure you’re going to use one, though, it’s best to omit it.
Outdoor Kitchen Essentials: The Countertop

A countertop is a basic, yet versatile element of outdoor kitchen essentials. It brings the convenience of indoor cooking outdoors and is basically what upgrades the grill station to an outdoor kitchen.
There are multiple rules to follow if you want to keep your outdoor kitchen convenient, long-lasting, and safe. There are three outdoor kitchen sizes and they’re determined by countertop length:
- small (10′)
- medium (16′)
- large (20’+)
A small countertop can accommodate a grill, sink, cooktop, and storage. A medium can fit a grill, sink, cooktop, storage, and refrigerator. A large one is basically a kitchen for multiple cooks and fits all needed appliances.
The first thing to think about is how much space you need and how many appliances you know you’ll add.
Once you have your answer, your second step is figuring out countertop height measurements. The height of an outdoor kitchen depends vastly on owners’ height. While the standard is 36″, but for people smaller or higher than average, it’s not going to be most comfortable height.
It’s worth knowing that not only people’s height determines the countertop height: a standard under-counter fridge needs 38″.
Each type of countertop has a different height and depth. It works differently for a bar, tabletop, and regular countertop. While the standard countertop height is 36-38″, the tabletop should be around 30″ and the bar should be 42″.
While the main countertop can be easily adjusted to owners’ height, the tabletop and bar depend vastly on standardized chair sizes.
The standard depth of an average outdoor kitchen counter is 30″, the tabletop is 38″, and bar is at least 12″ (since most plate sizes are 9″).
Your third detail, which is crucial for convenience, is spacing. Your outdoor kitchen essentials won’t be enjoyable to use if everything is cramped.
For the grill, expect around 24″ on one side and 12″ on the other. The cooking area needs 12″ on both sides. The sink will need around 18″ on both sides. If appliances are combined the higher distance should be multiplied by 1.5.
Many professionals say the biggest DIY mistake is not creating enough space next to appliances. You’ll grow irritated if everything gets cluttered and doesn’t have enough space to use comfortably.
Last, but not least, you need to consider material when picking outdoor kitchen essentials. The most reliable outdoor kitchen countertop material I recommend is granite. It’s very long-lasting, food safe, and looks absolutely gorgeous. It’s a natural material that holds up well to the elements and time.
If you already have outdoor kitchen countertops and aren’t sure if they’re made out of dependable material, I have a useful test you can try.
How to Test Your Outdoor Kitchen Countertop Materials
There’s a simple test that helps you figure out if your slab is suitable for the outdoors: The Lemon Juice and Oil Test. It takes up to thirty minutes and should be performed on a part of the slab that isn’t immediately visible.
All you need to test one of your outdoor kitchen essentials are:
- a slab
- a drop of lemon juice
- a drop of oil
- a clock
Put two drops, one of lemon juice and one of oil on the slab and start observing. If the slab isn’t getting darker in thirty minutes, the quality is excellent.
Getting darker after four to fifteen minutes means the slab can be used for outdoors, but should be sealed.
If fizzing or bubbling happens, or spots after liquids become dull, the slab shouldn’t be used. This could be a sign of calcite, a soft material that is better suited for indoor environments.
This might only be a good test if you don’t plan on selling your outdoor kitchen. If you do, try the Water Test. This will tell you if the slab needs sealing, but won’t tell you about potential calcite.
An excellent quality slab shouldn’t get darker in thirty minutes. If the slab gets darker in four to fifteen minutes, it needs one layer of sealer.
The last thing is to protect the construction from scorching hot appliances.
The price of a countertop depends on the material. Basic granite costs about $60 per sq. ft. Concrete countertops have similar prices.
Outdoor Kitchen Essentials: Storage

There are basically three ways of doing outdoor storage: build-ins, carts, and functional outdoor cabinets. There are advantages to all of these options, but a mixture works well, too!
Built-Ins
There are plenty of options for built-ins, most of them are made of stainless steel. This is a solid material for outdoors, but if you don’t like the slightly industrial look, there are other types to choose from like polymer or wood.
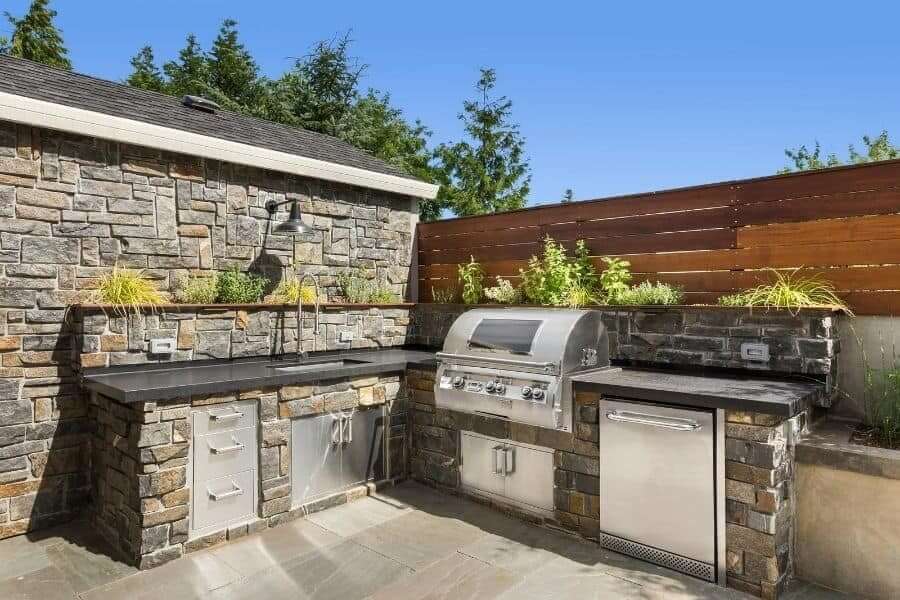
Built-ins are used not only to store utensils and spices, but also to provide access to the installation.
What you can see on a picture above are cabinets under sink and grill. They provide access to the gas line and plumbing. If the grill needs a tank, a drawer with ventilation should be added to store an additional tank.
These cabinets can be used for storing other items like brushes, soap, rags, and more.
I recommend a set of drawers for several reasons. First of all, you can designate some drawers for marinating. Second of all, there are specialized warming drawers that can heat up buns for burgers and hot dogs.
Even drawers without a little extra magic are going to be super useful in this area. A regular set costs $100+.
Carts
Carts can also be super useful and, for very active homeowners, are one of the ultimate outdoor kitchen essentials. First of all, they move so you can use them only where you need them most.
They can be made of any favorite materials and don’t have to be suited for the outdoors since you can just put them in the garage when not in use. They can fix the “too little storage” issue at your outdoor kitchen, too.
You can even fill them up indoors and bring them out each time you wish. The price is $150+.
Outdoor Cabinets
Want a middleground between a functional cabinet and outdoor kitchen countertop space? Consider high-quality outdoor cabinets for your outdoor kitchen essentials list.
Some of the best materials for outdoor cabinets are HDPE or stainless steel. HDPE, in particular, is becoming a very popular thermoplastic material for how resistant it is to:
- Mold
- Rust
- Rot
- Warping
- Scratching
- Fading
While outdoor cabinets are more expensive due to coming with add-ons such as an ice tray or countertop, they’re very long-lasting and functional. They’re the go-to option for homeowners with smaller kitchens who need their outdoor cabinet to provide several functions at once.
Outdoor Kitchen Essentials: Sink

The sink is one of the true outdoor kitchen essentials. If you want to wash vegetables and cook comfortably, an easily accessible water source is truly a necessity.
Unfortunately, sinks need plumbing, so adding them can get pricey. A permit might be needed and could cost you a few hundred dollars.
The whole process can be simplified, though. I researched the sink installation a little and there are multiple ways you can install your outdoor kitchen sink:
- a simple under-the-sink bucket ($10)
- lift station ($400+)
- dry well ($30)
- drain line ($750+)
Each of these solutions has their advantages. The most convenient are dry well and installation, but both may require permits. A dry well is also limited and only allows rinsing hands and vegetables (no soap or food chunks can go down the drain).
A lift station and under-the-sink bucket don’t require installation, but require extra work and attention on a daily basis. Read my in-depth guide to learn more about the ins and outs of outdoor kitchen sinks.
Outdoor Kitchen Essentials: Covers

An outdoor kitchen is a space exposed to elements, so there are multiple reasons to keep it covered!
- increase the longevity of appliances and construction
- elongating BBQ season a little
- protecting people from wind, rain, or excess sunlight
The best coverage for an outdoor kitchen vastly depends on location. In mild climate regions, protection from sun and rain is going to be very comfortable. In regions with cold winters, protection from rain, wind and snow is more of a concern.
The most popular coverings for outdoor kitchens are pergolas, gazebos, and roofing over patios. Pergolas cost on average $300 – $15,000, gazebos $300 – $20,000, and building a roof is $7000 – $11,000.
The cheapest options are available online and may require a little bit of DIY skills.
Outdoor Kitchen Essentials: Ventilation

There are basically three types of ventilation to consider for your outdoor kitchen essentials. The goal of all of them is to keep your cooking station as safe as possible.
An island vent is a panel that should be installed everywhere where a gas grill is in use. It traps escaped gas and helps in case of a leak in the installation. The price is about $20+.
A vented tank drawer is a safe way to house propane fuel near the appliance. The price is around $250+.
A vent hood is an over-the-grill solution if your outdoor kitchen is located on a covered patio with limited airflow. It clears away the thick smoke grilling can produce. The price is $500+.
Outdoor Kitchen Essentials: Lighting

Lighting makes an outdoor kitchen feel extra special. It’s worth designing outdoor kitchen lighting prior to construction for both functional and style reasons.
There are three types of lighting to incorporate for your outdoor kitchen essentials next to the house (and an additional two for a distant one).
Lighting for a Next-To-The-House Outdoor Kitchen
When designing a perimeter outdoor kitchen, it’s worth taking three types of light into consideration:
- Ambient light
- Task light
- Accent light
The ambient light illuminates the whole area. Fixtures that can be used to get this effect are:
- recessed lights
- chandeliers
- fans with light sources
- more
The task light is crucial for safety in your outdoor kitchen essentials. This is the light that makes cooking after sunset possible.
The goal here is not just for chopping or grilling safely, it’s also to view cabinets’ content. Task lights include:
- Larger overhead lights
- Grill lamps
- LED strings attached under the counter. This category includes inexpensive LED grill lamps attached to a grill
Accent lights‘ role is to stress the beautiful elements of your outdoor kitchen and draw attention to it. If you have a beautiful finish on the walls or a lovely fireplace, these lights help draw attention to detail.
Lighting for Satellite Kitchens
Satellite kitchens also need ambient, task, and accent lights. What differs them is a distance from the house, so you need a well-illuminated path.
The additional types of light are:
- Path lights
- Stair lights
Guests need a well-illuminated path to safely reach the house. Path lights can also add a lot of charm to the backyard.
Lighting for an outdoor kitchen is a fascinating subject. Read my in-depth outdoor kitchen lighting guide if you need design inspiration or want to learn about the fundamentals.
Outdoor Kitchen Essentials: Trash

A trashcan is a necessity while cooking. It can be convenient to hide one in a drawer/ cabinet, but a free-standing trashcan works well, too.
It’s worth considering one that allows trash segregation so you can have an easier time recycling certain materials.
A garbage can isn’t usually budget-breaking, so be careful you don’t overlook it while considering more expensive essentials. It’s a vital addition because bringing all the trash back to the indoor kitchen is a huge pain.
Outdoor Kitchen Essentials: Refrigerator

A refrigerator outside makes cooking way more convenient. It creates a cold zone, which makes the entire outdoor kitchen more functional.
There are plenty of appliances to choose from, but outdoor-rated appliances come with a price. The cheapest models are about $500.
If you’re short on budget, but dream of a kegerator, you can use a workaround. A smaller keg will leave enough space so your food and beverages can be stored inside.
Outdoor Kitchen Essentials Keep You Safe, Cozy, and Happy
These outdoor kitchen essentials are vital for food safety, ease-of-use, and enjoying the feel of your set-up. While the smaller details may change – like preferring HDPE cabinets over a cart for storage – the fundamentals stay the same.
Want even more design inspiration for your outdoor kitchen? Don’t miss these useful guides on grilling, exterior design, and more:


![26 Epic Tips For an Outdoor Kitchen Patio [Ideas + Pictures]](https://outdoorkitcheninsider.com/wp-content/uploads/2020/09/outdoor-kitchen-patio-tips-small.jpg)

![How to Build an Outdoor Kitchen on a Budget? [and save 3k+]](https://outdoorkitcheninsider.com/wp-content/uploads/2020/10/how-to-build-an-outdoor-kitchen-on-a-budget-small.jpg)